contact us

Use the form on the right to contact us.

You can edit the text in this area, and change where the contact form on the right submits to, by entering edit mode using the modes on the bottom right.


123 Street Avenue, City Town, 99999

(123) 555-6789

email@address.com


You can set your address, phone number, email and site description in the settings tab.
Link to read me page with more information.

used - sukasana.jpg

Blog


EKA PADA KOUNDINYASANA 1 (AND PARSVA BAKASANA OR SIDE CRANE/ CROW POSE)

Olivia Marley

FullSizeRender[2].jpg
FullSizeRender[4].jpg

These can look like daunting postures the first time you see them. But if you look closely at side crane pose (left photo above) you can start to break it down. Your lower body is in a squat with your legs together; your spine is in a twist; and your upper body is in chaturanga dandasana (click here for our blog post on chaturanga if you're not sure what that looks like!). So before attempting these postures, building in some hip flexion, spinal twists and making sure your chaturanga is solid will be an effective way to warm up your body. That's also key to how I'd sequence a class to help my students access these poses. 

Start in a squat with your legs together and your hands in prayer (left photo below). Then twist to your right and hook your left elbow on the outside of your right knee (right photo below).  
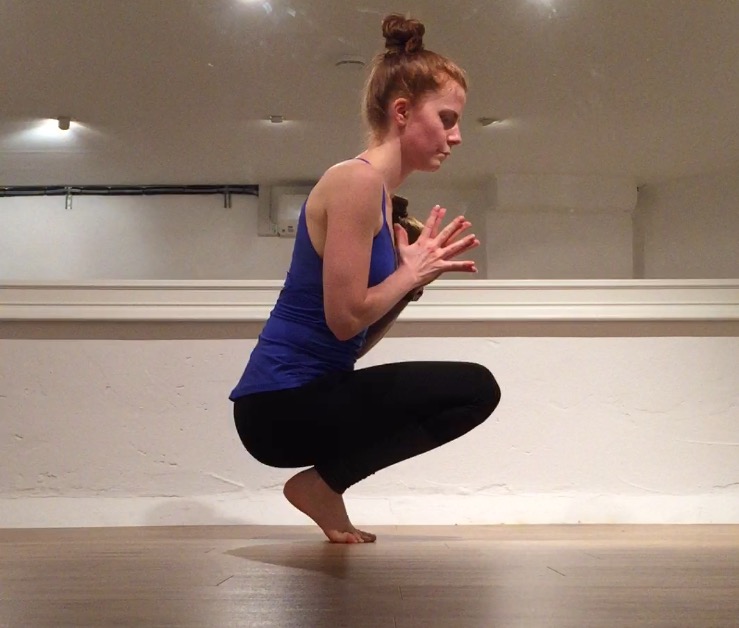
FullSizeRender copy.jpg
FullSizeRender[1] copy.jpg

Take a couple of goes to get that elbow as far on the outside of that knee as you can. Holding your right thigh in place with your right hand might help you. Then place your left hand on the floor (left photo below). Place your other hand on the floor shoulder distance away from the first hand (not too close together!).

FullSizeRender[2] copy.jpg
FullSizeRender[3] copy.jpg

Lift your hips and start to turn your chest in the direction your fingers are pointing. Start to take a bit more weight on to your hands (left photo below). Grip with your fingertips, look forward of your hands and maybe take one foot off the floor (right photo below).

FullSizeRender.jpg
FullSizeRender[1].jpg

Keep turning your hips in the direction your fingers are pointing and gradually lift your other foot off the floor (left photo below). Keep looking forwards of your fingers and if you feel secure slowly straighten your bottom leg while keeping it in contact with your arm (right photo below).

FullSizeRender[2].jpg
FullSizeRender[3].jpg

If you're still feeling secure straighten your top leg out behind you (bottom photo). Slowly bring your feet back down and try on the other side!

If you can't get through all of these steps first time don't worry. Just pay attention to which step you get stuck on, because that might tell you something about your body. For example, if it's hooking your elbow on the outside of your knee that's difficult, you might need to work on your twists and outer hip mobility. If it's lifting your hips up that's tough it might be a lack of core strength, or if you feel like your arms can't hold you it could be upper body strength. 

As always - we're very happy to take your questions. Just ask! 


FullSizeRender[4].jpg

MORE SPACIOUS TWISTS

Olivia Marley

I had a question from a student last week about always feeling squashed in twisting postures, which has led on to this week's focus in class. The first thing that's worth saying is that your torso is inevitably going to feel a bit compressed in these types of poses. You can see from the photos above that my abdomen ends up pressed against my thigh. But there are definitely a couple of little adjustments you can make to create a bit more space in your twists! Read on for step by step instructions for the postures above....

Start in a lunge with your right leg forwards and hands in prayer (see picture below left). Hook your right thumb into your right hip crease, just where your thigh joins your torso, with your fingers wrapped around towards your bum. Reach your other arm up towards the ceiling. Push your right thumb down towards the floor and encourage that hip to wrap a little bit in towards the centre line of your mat (see below right). Feel how anchoring that hip down and back allows you to reach your other arm and lengthen your spine upwards a little more.

Keep your thumb pushing down into your hip crease and keep lengthening through your torso as your reach your other arm forwards, then hook your elbow on the outside of your front knee (below left). Keep lengthening your spine as you bring your palms together (below right). Push your front knee out against your elbow and turn your belly and ribs a little further around, aiming your thumbs towards the centre of your chest. This is a brilliant pose in itself - if it feels enough for you, stay here!

If you want to deepen the twist a little further, take your top hand on to your front thigh. See if that helps you slide your other elbow a little more down the outside of your leg (below left). If when you straighten your bottom arm that hand now reaches the floor, put it on the outside of your foot (below right). You don't have to get your palm all the way down - fingertips works too! If your hand doesn't reach the floor bring your hands back into prayer position.

If your bottom hand is on the floor, push your leg out against your arm and turn your chest more towards the ceiling. Then reach your other arm up (see below). After a few breaths here, step back to downward facing dog and repeat on the other side.

Simple sequence for a stiff lower back

Olivia Marley

I had a question this week from someone that said they often felt stiff and tight in the muscles on either side of their back. I'll preface this with saying: if you have back pain, go see a doctor/ osteopath/ chiropractor etc. But if you just want to move your spine a bit more and stretch out some of the muscles in the back of your torso this is a great little sequence. It may help improve flexibility in the backs of your legs too, which can also be good for back discomfort. Remember: be gentle. Don't force anything! 😎

1. Sit on the floor with your legs out straight in front of you. Take your hand to your lower back: if you can feel your vertebrae sticking out (instead of your lower back having its natural inward curve) sit up on a block/ couple of books/ folded up towel/ something like that. If you still can't sit up straight bend your knees until you can. 

Leave your right leg where it is. Bend your left knee and step your left foot to the outside of your right thigh. Put your left fingertips on the floor behind you. As you inhale push down into your left hand and sit up tall. As you exhale turn towards your top knee and either cradle it with your right arm or put your right elbow on the outside of that knee. For your next five (slow!) breaths: each time you inhale sit taller. Each time you exhale turn a bit more towards your top knee. 

TIP: notice how it's easy to sit tall through the left side of your torso by pushing down into your back hand. See if you can also create the same amount of lift through the other side of your torso. 

2. As you inhale release the twist and face forward again. Bring your left foot back to its own side of your bottom leg. Keep your left knee bent but this time let your knee fall out to the side. If it doesn't reach the ground support it with a pillow or rolled up towel. Turn your chest to face towards your left knee and place the back of your right hand on top of your right leg. Keep facing towards your bent leg and as you inhale sweep your left arm up alongside your ear; as you exhale bend sideways towards your extended leg. Take five slow breaths here. 

TIP: notice how your top shoulder wants to drop forwards so your chest turns down towards the floor. Try to resist the temptation to do that; instead back out of the posture a little and turn your chest more up to the ceiling. Lean your top shoulder a little bit back. You might not be able to reach your top arm so far but the stretch will be more in the side of your body (which is what we're trying to target here!). 

3. As you inhale, lead with your top arm to come all the way back up. Keep your legs where they are but this time turn your chest to face towards your extended (right) leg. Again, remember that slightly bending that leg may help you sit up taller. Place your finger tips either side of that extended leg. As you inhale sit tall; as you exhale turn more towards that leg and fold (= yoga jargon for lean your chest down towards your leg!). Hold for five slow breaths. As you next inhale sit all the way up again, and repeat the whole sequence on the other side. 

As always, let me know if any comments or questions! 🙏🏼♥️