contact us

Use the form on the right to contact us.

You can edit the text in this area, and change where the contact form on the right submits to, by entering edit mode using the modes on the bottom right.


123 Street Avenue, City Town, 99999

(123) 555-6789

email@address.com


You can set your address, phone number, email and site description in the settings tab.
Link to read me page with more information.

used - sukasana.jpg

Blog


Filtering by Category: yoga

Hanumanasana (for people not flexible enough to do the splits)

Olivia Marley

We've been looking at hanumanasana or the splits a bit in class recently. This is one of the few postures where I think using the English name of the pose can sometimes put people at a disadvantage: everyone has seen gymnasts or dancers on the TV doing the splits, so think that's what this posture should look like. And since most people aren't ex-gymnasts, that means for a lot of people:

  • the splits immediately feels unobtainable and they tell themselves they already know they can't do it

  • they focus on the mental picture they have of what the splits should look like, and feel defeated/ disappointed/ annoyed when their body doesn't match it

  • because of the above, they never actually work on this posture so miss out on all the benefits it brings (loads of hip and lower body opening, plus a feeling of empowerment once you reach your arms up for the full posture)

  • their mental image of the splits is so dominant they don't listen to their body and force it into shapes it's not ready for, even if that's something they'd never dream of doing in other postures.

Basically, this posture can definitely bring up some stuff for people! So instead of working on 'the splits' we've been working on optimal alignment in 'hanumanasana' (aka posture dedicated to Hanuman). And more specifically, 'hanumanasana for people that aren't flexible enough to do the splits'. 

If you had to pick just two postures to warm up for hanumanasana it's got to be the two shown below: anjaneyasana or low lunge, and ardha hanumanasana or half splits. They warm up the back leg and front leg respectively. 

In low lunge (picture 1): as you inhale think upper body tall. As you exhale lift lower belly muscles strongly in and up (that will help you get a more effective stretch in the front of your back leg hip). Notice how your pelvis twists a little towards your back leg. And resist that by bringing your back hip (which in the photo is my left) a little forwards. After a few breaths see if you can lunge deeper on an exhale. 

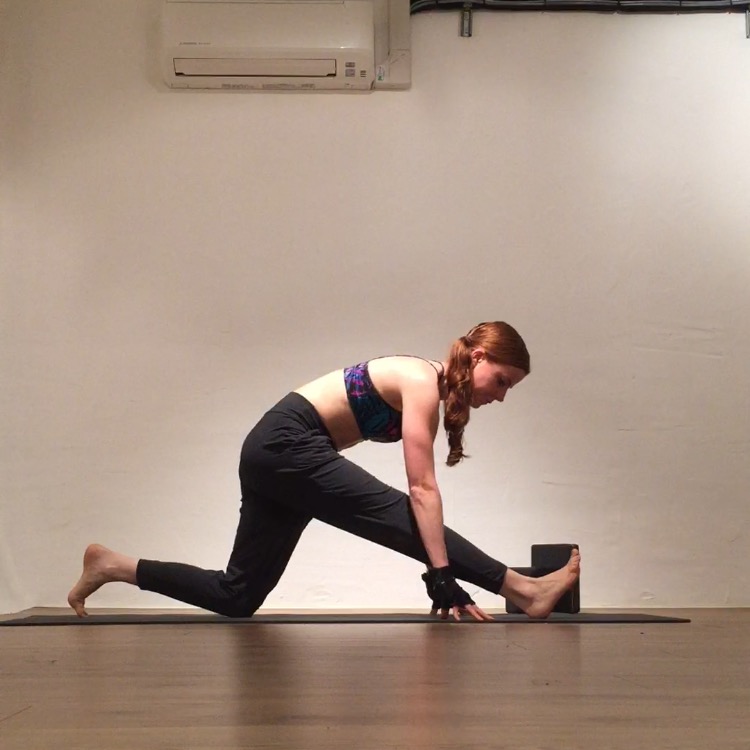
In ardha hanumanasana (picture 2): rather than rounding through your upper back to get your chest towards your leg, instead push your front heel straight down into the floor. Then isometrically (ie without actually moving it) drag your front heel towards you. Pull your front (here, my right) hip back and move your back hip a little forwards, and stick your tailbone out behind you. 

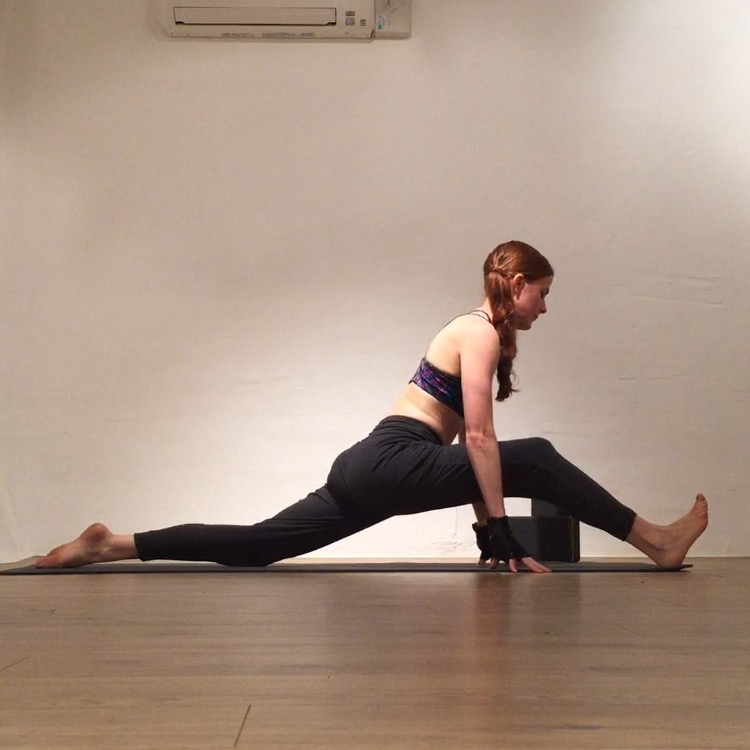
Then try sliding your front heel forwards until it can't go any further (picture 3). This is often where people stop when working with hanumanasana. Notice if all of the sensation is in the hamstrings of your front leg, with very little feeling in your back leg. If so, know that is completely normal but ideally this posture is about both legs equally. 

So to shift some of the demand into your back leg, try bending your front knee and letting your hips drop a little lower towards the floor (picture 4). Then maybe you will also feel a stretch in the front of your back leg hip. Take a breath or two there then see if that has created space for you to slide your front heel a little further forwards. Keep on cueing yourself to draw your front hip a little bit back and your back hip forwards - don't let your pelvis twist towards your back leg. As with every other yoga posture, don't sacrifice the integrity of the pose (ie keeping your hips square) for range of motion (aka taking your legs further apart). 

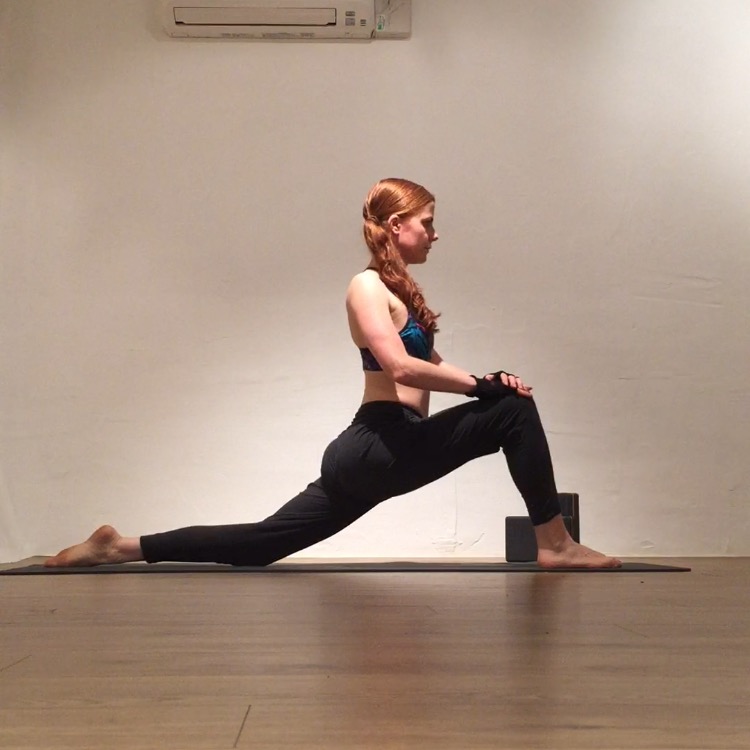
Once you've reached your limit, grab some support and place it under the top of your front thigh (so not under your bum, under the top of your hamstrings). I've used a block (in the picture at the top of this blog post) but you can use whatever you have to hand to give you as much height as you need. So maybe a bolster, or a pyramid of 3 bolsters stacked on top of each other; a stack of books, one or many firm pillows. Whatever works! Whatever it is, make sure it's stable. Then walk your arms back in towards you and reach them up to the sky. Take a few breaths here: feel your front leg, feel your back leg, and feel upper body reaching up through centre. Then bring your hands to the floor, wriggle out of the posture, and repeat on the second side. 

And ask if you have any questions! 🙏🏼✌🏼

L-pose or handstand prep

Olivia Marley

This blog post is in response to a student who wanted to practice this posture at home. If you're going to give it a go too remember to back off if anything hurts, and if you're at all unsure maybe have someone nearby to spot you the first time you try it! L-Pose is a great way to build your upper strength in preparation for handstand, without having to worry too much about your balance. And if you want to know when we run our next handstand workshop to help you build your confidence and proficiency in this challenging posture send us a message and let us know!

So if you're ready, start on your hands and knees with the soles of your feet flat against a wall....

IMG_4349.PNG

Photo 1: Check that your knees are directly under your hips, and your hands are under your shoulders. You can see that my hands are mistakenly a little too far forward here - it’s much easier if you have a mirror or someone to spot you! Rather than letting your chest sink passively down to the floor, actively push the floor away from you. Activate your core muscles by drawing your lower ribs in towards your spine.

IMG_4350.PNG

Photo 2: keep your hands and feet where they are and come into a slightly odd, too short downward dog at the wall. If you have tighter hamstrings you may have to bend your knees quite a bit.

IMG_4351.PNG

Photo 3: place one foot on the wall at about hip height. If it's too low, your foot will just slide down the wall. And if it's too high you'll end up in a diagonal line rather than the ninety degree angle we're looking for here.

IMG_4352.PNG

Photo 4: actively push your top foot into the wall. In the photo it looks like I'm walking my feet up the wall. But if you look closely, you can see my bottom foot is in mid air. As you push with your top foot, it will send your hips away from the wall and more over your wrists, which will make your bottom foot lift. 

IMG_4353.PNG

Photo 5: place your bottom foot next to your top foot. If you know you're a little tighter in your hamstrings it's completely fine to keep your knees bent a little. Push the wall away with your feet, and the floor away with your hands. You can see that having my hands slightly too far forward when I started has meant they aren't underneath my hips here. If you haven't got a friend nearby to spot you maybe try filming yourself on your phone to check how your upside down 'L' looks!

It's super common for people to take their feet too high and their hands too far forward when they first attempt this posture. That way they end up in a diagonal line (which is fine sometimes, but not what we're after here!). It happens because when you first straighten your legs and send your hips over your hands, if you're not used to being in that position it feels like your hips are going way too far. So moving your hands and feet feels much safer! If that step (shown in photo 4) does freak you out at first, know that it's perfectly valid to just practice that until you feel comfortable. There's never any pressure to come into the full posture until you're ready. And just ask if you have any questions! 

Better posture for your upper body

Olivia Marley

So these aren't exactly the most glamorous yoga photos ever (!) but they show some really effective postures. So they're making up the next in our ‘yoga for hunched winter shoulders’ series.

If you picture how you might hunch your shoulders and cross your arms when you’re outside in cold weather - or the position your upper body might be in after you’ve been sitting at a computer for a while - there are a couple of things that tend to happen:

  • the muscles that draw your shoulder blades down and together get overstretched and weak from the shoulders constantly being slightly lifted and forwards

  • the muscles across the front of your shoulders/ chest can get tight and shortened.

So here are the two things I do over and over again to disrupt those postural habits. The top two photos are the same posture but on different sides, so you can see what I’m doing. Make sure the elbow of the arm on the floor is above the level of your shoulder- if it’s in line with your shoulder or below you won’t affect the muscles we’re trying to target. Start lying on your front and then super slowly and gently roll towards that side of your body. 


IMG_4205.PNG

You might find your body doesn’t roll as far to the side as mine does, or that it goes further. It doesn’t matter either way! Just be mindful that you’re rolling your whole body weight against your shoulder girdle, so while this is a great stretch for your pecs you do need to be gentle with it. Roll towards the arm on the floor until you feel the amount of stretch you want to feel in that side of your chest, and then hold there. Take a few deep breaths up into that side of your chest and then repeat on the other side. This should help relieve tension in the tight muscles in your chest. 

IMG_4206.PNG


The bottom photo here shows a simple locust pose. Make sure your palms are facing the floor, and as you lift up concentrate on squeezing your shoulder blades together and drawing them down your back away from your ears. This is a super simple but effective way to strengthen those muscles we’re trying to target in your upper back. Lift up for a few breaths, rest then repeat.
 

IMG_4204.PNG

You could do these at home in five minutes, a few times a week. Try it for a month and see if you feel like you're standing up any taller.... And just ask if you have any questions!